## Call: Political Communication Between Disruptive Technologies and Democratic Backsliding

::: section

The Standing Group invites submissions to *Political Communication Between Disruptive Technologies and Democratic Backsliding*, a section of the *ECPR General Conference 2026* taking place at **Jagiellonian University** in **Kraków** on **8–11 September 2026**. Chaired by **Johanna Burger** (**Freie Universität Berlin**) and **Thomas Milic** (**University of Zurich**) and endorsed by the ECPR Standing Group on Political Communication, the section seeks research that clarifies how technological change, information disorders, and political strategies interact to affect democratic institutions and public discourse.

We welcome theoretical, empirical, and methodological contributions addressing themes such as generative AI and platform dynamics, disinformation and cross-border influence operations, the evolving role of journalism and fact‑checking, and actors’ strategies for resilience and institutional reform. Panel and paper proposals are open until **9 January 2026** — submit your proposal and consult the full guidelines via the link below.

Deadline: **9 January 2026**

<button class="readmore"><a href="https://ecpr.eu/Events/Event/SectionDetails/1677">Read more</a></button>

:::

---

## Call – Short

::: job
**Title:** Political Communication Between Disruptive Technologies and Democratic Backsliding (Section S69)
**Location:** Jagiellonian University, Kraków
**Deadline:** 9 January 2026
**Description:** Call for panels and papers on how emerging technologies, information disorders, media intermediaries, and political actors shape democratic vulnerability and resilience.
<button class="readmore"><a href="https://ecpr.eu/Events/Event/SectionDetails/1677">Read more</a></button>
:::ECPR PolCom Newsletter – Tutorial
Hi!
This page explains step by step for members of the ECPR PolCom Steering Committee how to create and send the ECPR Standing Group on Political Communication Newsletter, using GitHub.
No coding is required. Everything happens through the GitHub web interface and the ECPR website.
00 · Requirements and Setup
Before you start, make sure the following is in place:
- Log-in with:
- username:
ecprpolcom - password: shared with steering committee members
Alternatively use your own account or create one:
Create a GitHub account: https://github.com/signup
Ask to be added as a collaborator
If you’re a steering committee member, please ask thieled to be added to this repository: https://github.com/thieled/ecpr-newsletter(Optional:) Add billing details and a payment method to your profile settings. No costs will occur, yet this step is required to enable GitHub Models, which is used for the (optional), LLM-powered Step 04 - Summarize a Document
Once you are added, you can:
- upload files
- edit newsletter text
- trigger automated workflows
01 · Create a New Newsletter Issue
Each newsletter lives in its own folder, organized by year and issue number. To automatically create a new folder and copy the template, follow these steps:
- Go to the Actions tab in the repository
- On the left, click 00-Create-new-issue
- Click Run workflow (top right)
- Enter:
- Year (e.g.
2025) - Issue (e.g.
01)
- Year (e.g.
- Click Run workflow
What happens?
- A new folder is created:
issues/YEAR/ISSUE/ - A newsletter file appears:
newsletter_YEAR_ISSUE.qmd
You will see a yellow spinning wheel 🟡 while it runs.
Finished when it turns green 🟢.
Walktrough:
02 · (Optional:) Upload Documents and Images
Within each issue folder, you can upload:
- documents (CfPs, job ads, PDFs) →
/doc - images (used in the newsletter) →
/img
Instructions
- Click the Code tab
- In the folders, navigate to:
issues → YEAR → ISSUE - Open either:
doc/(documents)img/(images)
- Click Add file → Upload files
- Select your file(s)
- Enter a short, informative commit message (example:
uploaded cfp innsbruck) - Click Commit changes (green button)
Best practice
- Do not use whitespace in filenames
- Use clear names like:
cfp_polcom_2026.pdf,krakow.webp
Walktrough:
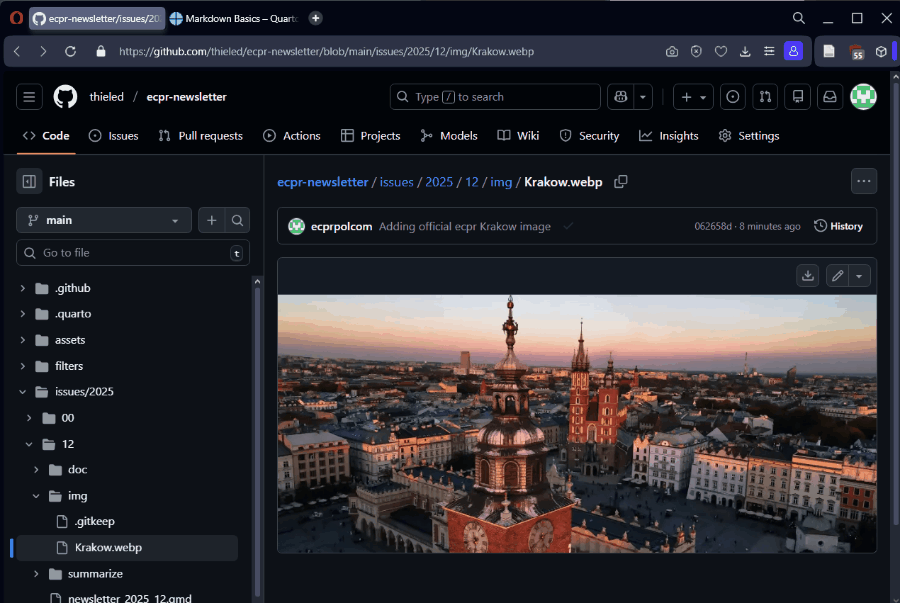
03 · (Optional:) Crop Images to Square Format
Newsletter images work best in 1:1 (square) format. The GitHub repository provides an automated workflow to corp uploaded images.
Instructions
- Go to Actions
- Click 01-Crop-image
- Click Run workflow
- Enter:
- Input path (from repo root), for example:
issues/2025/12/img/Krakow.webp - Leave output path empty
- Optional offsets (pixels):
-100moves crop left/up100moves crop right/down
- Input path (from repo root), for example:
- Click Run workflow
Result
A new image is created in the same folder: - Krakow_sq.png
It is cropped to square and saved as PNG.
Walktrough:
04 · (Optional:) Let a LLM Summarize a Document
To assist you with drafting the newsletter, you can let a language model (gtp-5-mini) create ready-to-use, markdow-formatted newsletter text from a document.
Upload one document for each individual event, call, or opportunity.
Supported formats: - .txt, .pdf, .doc, .docx
(Note: Please note that if you’re using your own account, this workflow only works after you have added payment information to your GitHub profile. For the current workflow, no costs occur though. The account ecprpolcom is ready to go.).
Instructions
- Navigate to the sub-folder:
issues\YEAR\ISSUE\summarize - Click Add file → Upload files
- Upload one document per event/opportunity
- Use a clear commit message (example:
uploading polcom section cfp 2026) - Click Commit changes
What happens?
- Summarization runs automatically after upload
- You can monitor progress under Actions
- A new file appears in the same folder:
yourfile_summary.md
Output contains
- A flowing announcement text (for the News section)
- A one-glimpse overview (for Call for Papers / Job Bulletin)
Important: always read and double-check before using.
Example
For example, the markdown-formatted summary for the Call for Papers for the General Conference would look like this:
Walktrough:
05 · Edit the Newsletter
The newsletter is written in Quarto markdown, which can be easily transformed in .html but is simpler to edit.
To do so, follow these steps:
Steps
- In the Code tab of the repository, navigate to the folder of the current issue:
issues → YEAR → ISSUE - Click on
newsletter_YEAR_ISSUE.qmd - Click the ✏️ Edit button (top right) - see details below.
- Once you’re done editing, click Commit changes.
- Add a clear commit message.
- Click Commit changes (green button).
Markdown Basics
Here are a few markdown formatting basics:
- Headings:
## Headline - Italics:
*italic text* - Bold:
**bold text**
For a more comprehensive guide, see here.
Table of Contents
The table is created automatically from the ## Headlines. To remove it, simply delete this block:
<!-- Table of Contents; Delete if not wished: -->
::: {.issue-toc}
:::
Images
All images included in the newsletter must publicly available, hosted on a web server. Follow the instructions No. 02 and Nr. 03 in this tutorial to upload (and crop images) and find the correct URL.
The correct URL is always the base URL:
https://thieled.github.io/ecpr-newsletter/
plus the relative/path/from/ecpr-newsletter, for example:
https://thieled.github.io/ecpr-newsletter/issues/2025/12/img/Krakow.png
Use this code snippet to insert images - simply replace the URL:
{.newsimg width="180"}
Overview Blocks (CfPs & Jobs)
The items in the Call for Paper and Job Bulletin section are both formatted by a section called ‘job’. You can edit or remove **Title**, **Location** etc. as you wish:
::: job
**Title:** ECREA
**Location:** University of Brno
**Deadline:** NN
**Description:** Short blurb describing the CfP
<button class="readmore"><a href="https://example.com">Read more</a></button>
:::
Walkthrough
06 · Edit the Publications Section
The newsletter includes a section ‘Recent Publications from our Members’.
Per default, all publications listed in the publications.bib file under /issues/YEAR/ISSUE/publications/ are included and auto-formatted in APA format.
You have three options to edit the publications list:
- Use a citation manager like Zotero + BetterBibTex to create the .bib entries
- Manually change .bib entries
- Ignore .bib and manually format the publication list
Here, I’ll focus on the first method:
Steps
- Add the publication items (articles / books) to a Zotero folder of your choice; ask Daniel to get access to a
ecpr-polcom-newslettershared Zotero folder. - Export the items: You can export a single entry or the whole folder in .bib format.
- Navigate to
/issues/YEAR/ISSUE/publicationsand edit ✏️ thepublications.bibfile. - Delete (or manually edit) the template entries and paste your copied entry.
- Commit the changes and make sure to re-render the .qmd file (see No. 07 below).
Walkthrough
08 · Send the Newsletter via ECPR
The final step is to copy the ready .html code to the ECPR newsletter webmail, send a test mail, and then send it to the members.
Steps
- Open the .html file on GitHub (in the issue folder)
- Click Copy raw file
- Go to: https://ecpr.eu/MyECPR/MyProfile?myProfileTabs=MyGroups
- Click on ‘Manage’ next to Political Communication group
- Open Send an Email
- Click CREATE AN EMAIL FOR ALL GROUP MEMBERS
- Click Source code (icon top left)
- Paste the copied HTML into the message field, nothing eles.
- Add a email subject
- Testing: Send a Test Mail to your own account (and have some patience) before sending it out to our members.
- Send final version: Once you’re satisfied with the content and layout, send the final version.
Walkthrough
Done 🎉